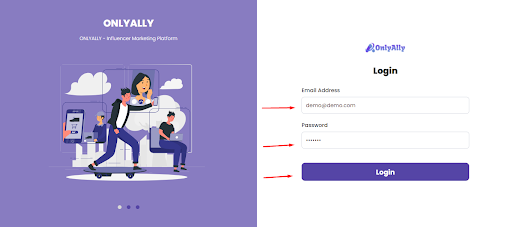
After registration, admin can login to the application using
valid login credentials.
The admin should enter valid login credentials.
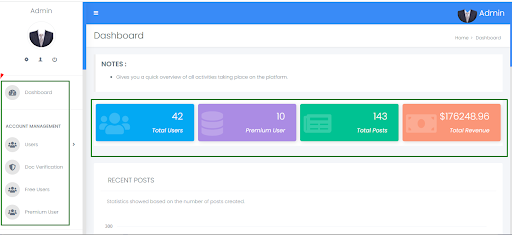
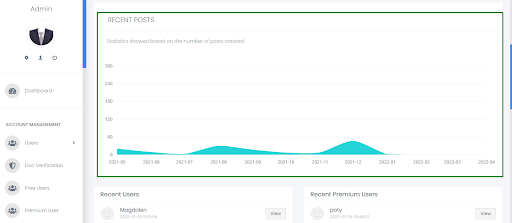
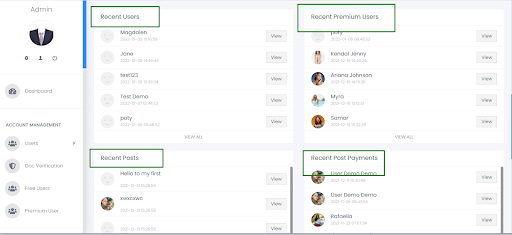
The dashboard is the front page of the Administration UI. It
provides convenient shortcuts for
common management tasks, some server information, and Review Board
project news updates.
And gives you a quick overview of all activities taking place on
the platform.
Here, The admin can view all the basic details such as users,
posts , users counts , posts counts ,
Posts statistics, recent posts, posts payments and total revenue
details.
The User Page is where you can review and manage the details
about the users on the admin account.
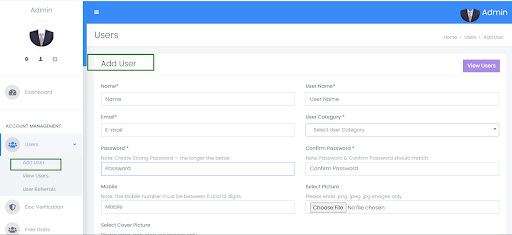
Add User
The action module, "Add user", lets the admin add a new user to a
list (or lists) with certain
information such as username , email id, password, mobile number, user
category , user profile picture and
user social details which is optional.
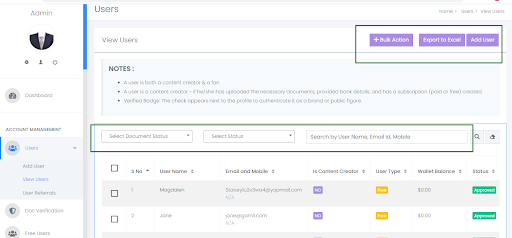
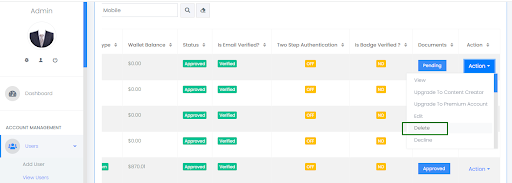
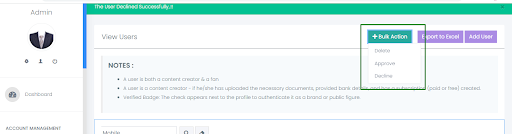
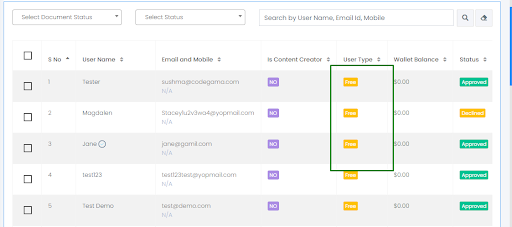
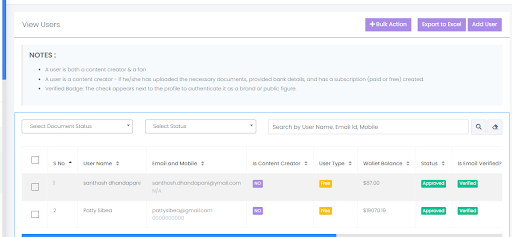
View Users
The View Users managemnet gives you a summary view of how each
user sees all of the features on
your site such as UserName , Email, Mobile Number, User Type, User
Status , Wallet, and some basic user
information.
The Admin can filter users on the list by standard or custom
status such as user and document
status.
The Admin can Search users by using username , email Id , and
mobile number.
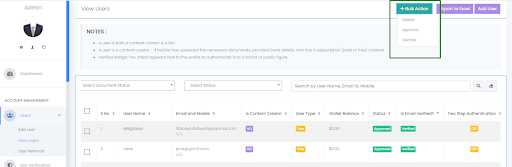
The Bulk action is an efficient way to complete certain actions
to multiple sections at one time as
opposed to completing the same action multiple times.Here, you can
perform a bulk action to: Delete,
Approve , and Decline the users.
The Admin can export users data from the user list to the excel
sheet format, using the “Export to
Excel” option.
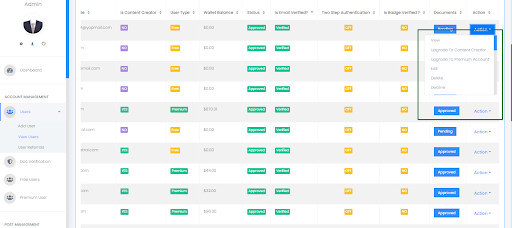
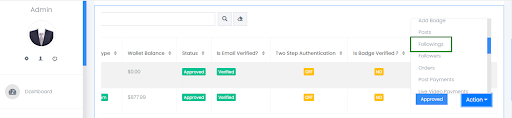
Action
The Action menu dropdown is used to take action on a specific
user within a list of users. They are
always used with lists of users or on a row within a table, and are
accompanied by a batch action dropdown
at the top of the list.
Here, the admin can do the internal actions such as add, remove,
delete,Decline, Approve, and is
able to do all user related actions.
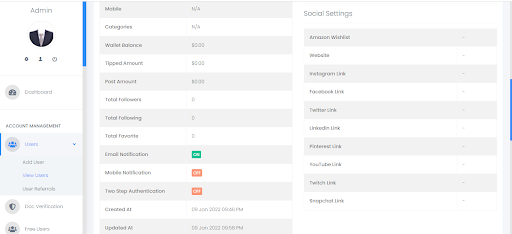
View User
This page gives all detailed details and activity status of the
particular user such as User,
account, category, payment, revenue, notification status and social link
details.
And provides all user related actions.
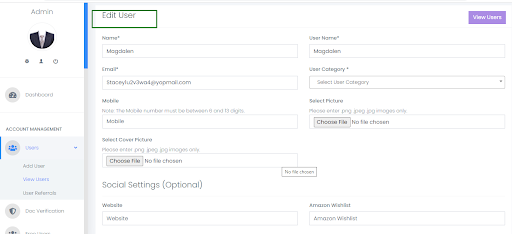
Edit User
The Edit User option provided to update user details such as a
user’s profile, category, contact
information and social links.
Here, The Reset option is provided to restore user details.
The Admin has full permissions to update the user profile.
Here, The admin is able to edit/update the user details by using
this option.
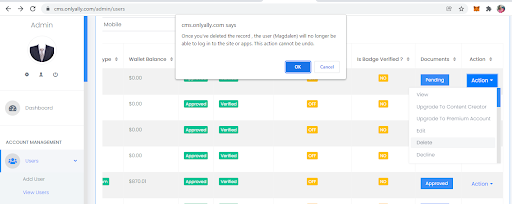
Delete User
The Admin can Delete Single/multiple user accounts.
Deleting a user from an application will permanently delete all
of their account, associated data,
documents, and more.
And deleted users are not able to login to the application.
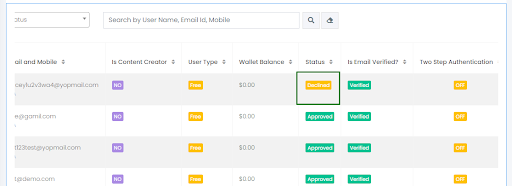
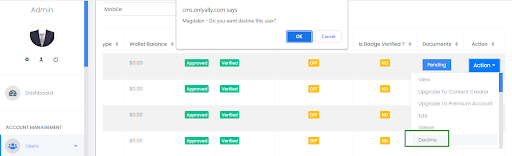
Decline User
The Admin can Decline Single/multiple user accounts.
Declining a user will temporarily block the user account.
And Declined users are not able to login to the application until
the admin approves.
And this declined user status is shown in the user list table.
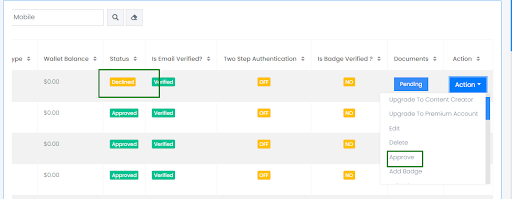
Approve User
The Admin will have an option to Approve Single/multiple declined
user accounts.
Using this option, the admin is able to approve the declined
users.
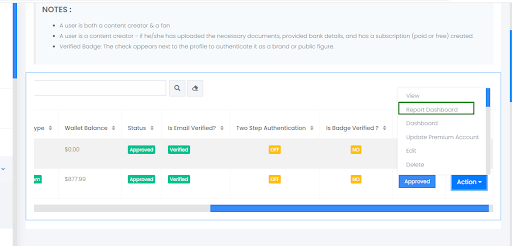
Add Badge
The admin will have an option to “Add Badge”.
Using this option, admin is able to make users as badge verified.
The badge verified/added user name is displayed with a badge
symbol.
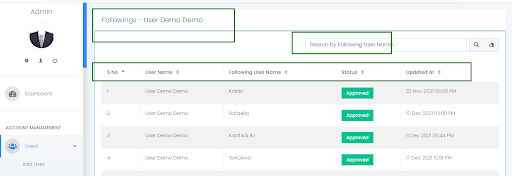
User Followings
The “Followings” option is provided, to view the following users
details of the specific user.
Using this feature, the admin is able to view the following users
details of the particular user.
The Admin can view the following username , Status , and updated
date.
And Admin will have an option to search following users by using
username.
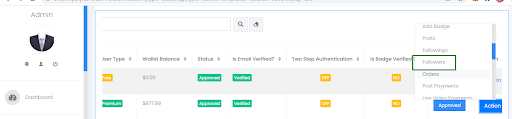
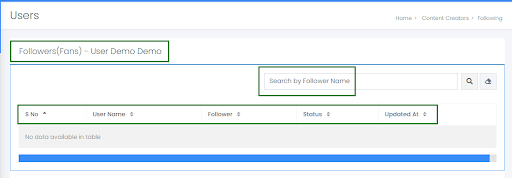
User Followers
The “Followers” option is provided, to view the follower details
of the specific user.
Using this feature, the admin is able to view the follower details
of the particular user.
The Admin can view the follower username , Status , and updated
date.
And Admin will have an option to search follow users by using
username.
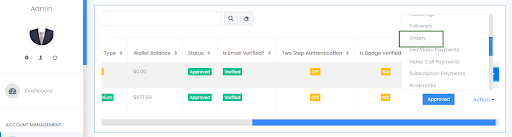
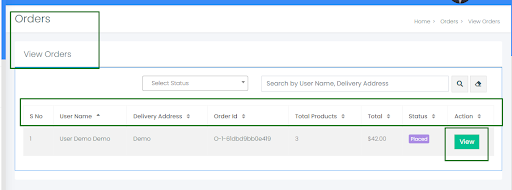
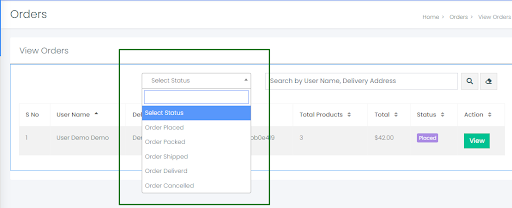
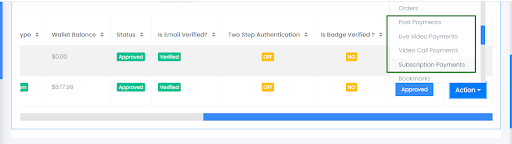
Orders
The admin will have an option to view order details of the
specific user.
The user order details will be displayed in the table with basic
details such as username, delivery
address, order Id, Total products, billing details and order status.
The Admin can be able to view in detail by using the view option
and able to search by using
username and delivery address.
And the admin will have an option to sort the order based on order
status.
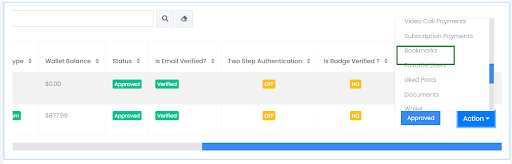
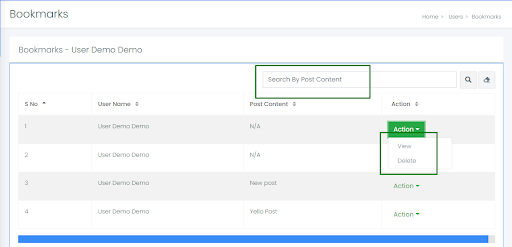
Bookmarks
A bookmark is an application feature used to save posts for future
reference on the user side.
The admin is able to view all user bookmarks post list here.
The Bookmarked posts are displayed with username, Post content and
some basic actions.
And Admin can remove bookmarked posts from the list.
The search bar is provided to search the posts by using the post
name.
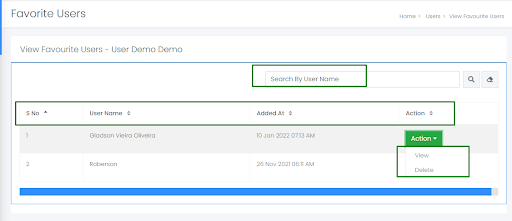
Favourite Users
This is an application feature used to save users for future
reference on the user side.
The admin is able to view all favourite users details of specific
users.
The favourite users are displayed with username,Added date and
some basic actions
And Admin can remove added users from the list.
The search bar is provided to search the user by using the user
name.
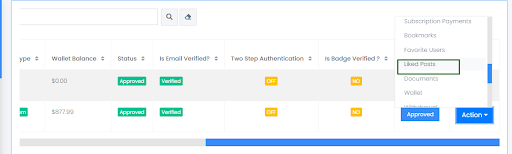
Liked Posts
Users will have an option to like the posts.
This is an application feature used to like the posts on the user
side.
The admin is able to view all liked posts details of specific
users.
The liked posts are displayed with postname ,post owner name and
some basic actions.
And Admin can delete the liked post records from the list.
The search bar is provided to search the user by using the post
user name.
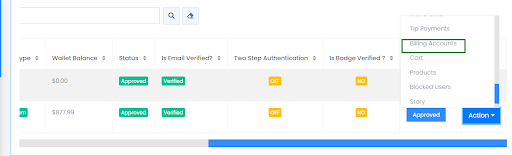
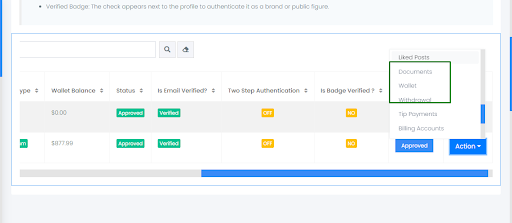
Billing Accounts
Billing accounts represent accounts held by the user for payment
purposes. Sometimes, users may use
different accounts to receive and pay invoices.
Here, the admin can be able to view all billing accounts added by
the specific user.
The billing account details are displayed with all users bank
details.
The search option is provided to the admin to search the billing
account by the name.
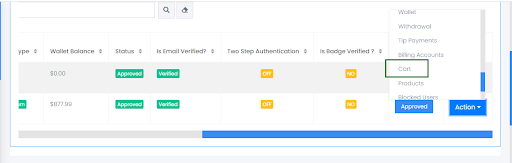
User Cart
A cart page is an essential part of an e-commerce website.It is
the page where users can pile up
what they want to buy from the website and then simply checkout by
paying online.
The Admin have the option to view the product details added to the
cart for a specific user.
The Cart details are displayed such as product name, quantity,
pricing details.
And the admin is able to remove the product from the cart list.
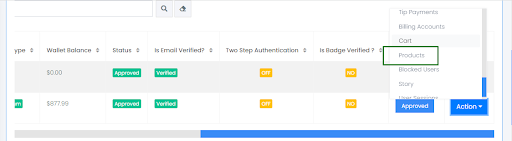
User Products
This option is provided only for the Content Creator.
Here, admin is able to view all added product details of the
specific user.
And the admin will be able to do some basic actions on the
products.
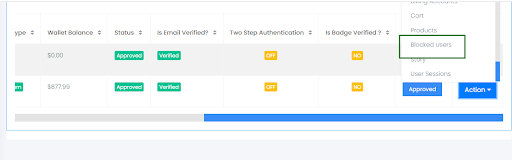
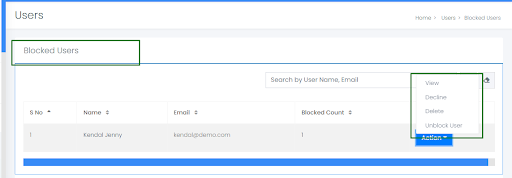
Blocked Users
This is an application feature used to block the users on the user
side.
The admin is able to view all blocked users details of specific
users.
The blocked users are displayed with username,Added date and some
basic actions
And Admin can Unblock users from the list.
The search bar is provided to search the user by using the user
name.
User Story
Here, Admin can view added user stories of particular users.
User Payments
This option is provided to view all payments details of the
particular user.
Using user payments, the admin can be able to view all payment
details of the user.
User Documents
This feature allows the admin to view the user documents uploaded
by the user.
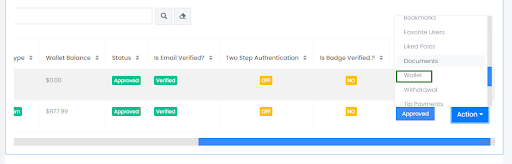
User Wallet
This option allows the admin to view the wallet details of the
specific user.
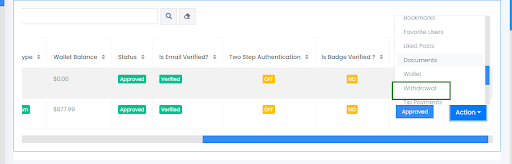
User Withdraw
Here, using this option , the admin can be able to view the
withdrawal request details of the
particular user.
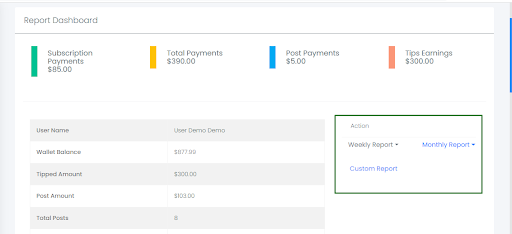
Report Dashboard
This feature is available only for the Content Creator.
Using this option, the admin can view user revenue details.
An admin is able to generate/download the reports on a weekly,
monthly basis and can create
customized reports.
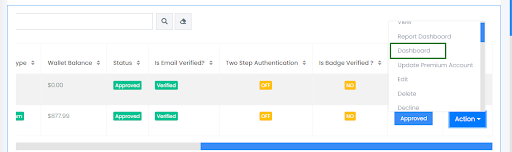
User Dashboard
This feature is available only for the Content Creator.
Using this option, the admin can view user posts and payment
statistics.
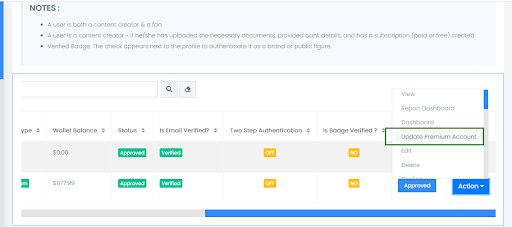
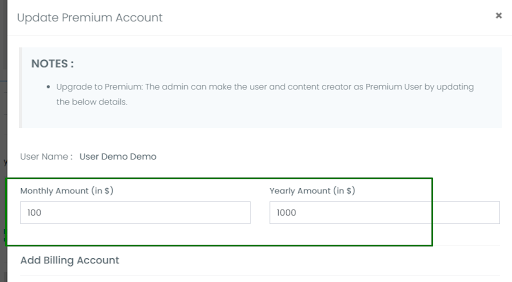
Update Premium Account
This feature is provided only for the Premium Users.
Using this feature, the admin can update premium users
subscription amount.
Using this feature, the admin can update premium users
subscription amount.
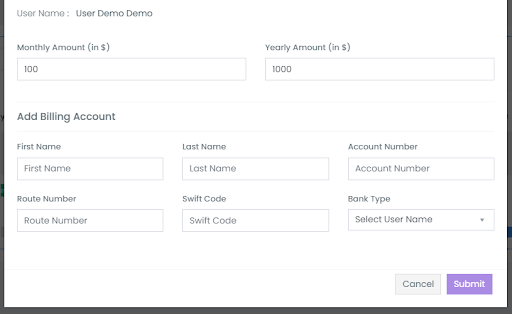
Here, The admin will have the option to update the billing
account, if the user does not add it.
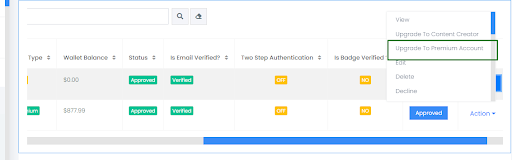
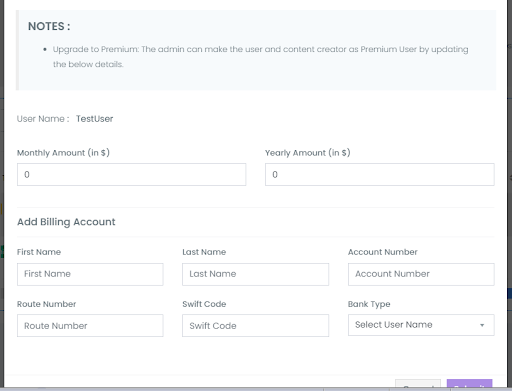
Upgrade to Premium Account
This feature is provided only for the Free Users.
Using this feature, the admin can upgrade the free users to the
premium user.
Here, Admin needs to update both monthly and yearly subscription
amounts.
Here, The admin will have the option to add the billing account,
if the user does not add it.
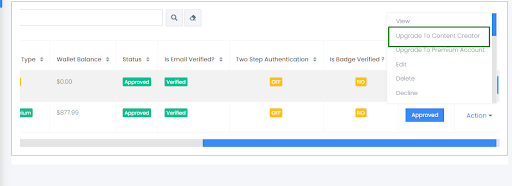
Upgrade to Content Creator
This option is provided only for normal users.
The admin will have the option to convert normal users to Content
Creator after verifying the user
documents and subscription amounts.
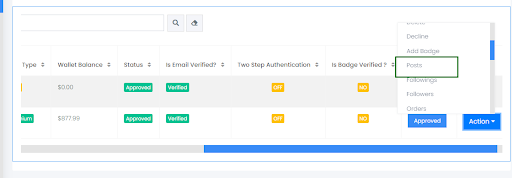
User Posts
This option provided only for Content Creator.
Using this, the admin can view all posts which are created by
specific CC.
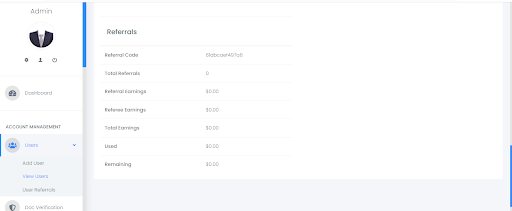
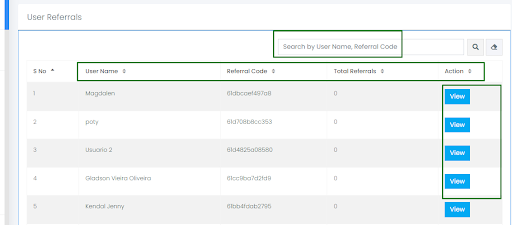
User referrals
Users can earn by referring multiple users.
All Users referral details are displayed here with username ,
Referral Code, and Total referred
users count.
Admin is able to view the referral details of the specific user by
using the view option.
The search option is provided to search the user details by using
username and referral code.
The referral and earning details are displayed.
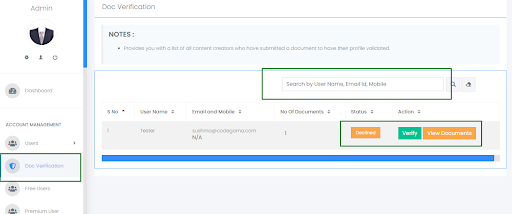
Document verification is the process of verifying the
authenticity of a document. Officially issued
documents, such as an Identification.
All User uploaded documents are available here.
Here, The Admin is able to view, decline and approve the
documents.
The search option is provided to search the documents by using
username , email id and mobile
number.
Users who do not upgrade to Premium are called free users.
Admin have the option to upgrade free users to premium users.
Users who upgraded their account to Premium account are called
Premium users.
Admin have the option to update premium amounts for these users.
Only the admin can make normal users to Content Creator.
To become a Content Creator, a user must send a “Become A Content
Creator” request and upload valid
documents and update their subscription amount.
Under This, the admin is able to create posts, View posts, and
view reported posts.
All Posts related details are displayed here.
The Admin is able to do post related actions here.
2 type of posts are there, one is free post and the other is
PPV(Paid )Post.
Create Post
Only the Content Creators can create a new post here.
Admin must enter all required details.
Admin can select the post categories which are mandatory.
Admin can set the price per post(PPV).
Admin can create Text, image, Video or Audio posts.
Admin can view all created posts inside the View Post page.
The created posts are updated on the user side.
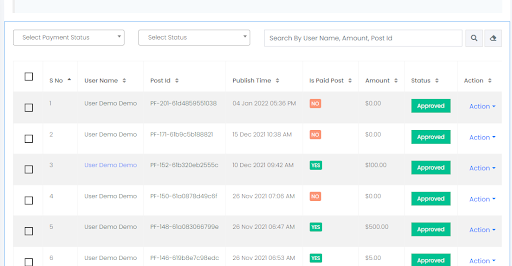
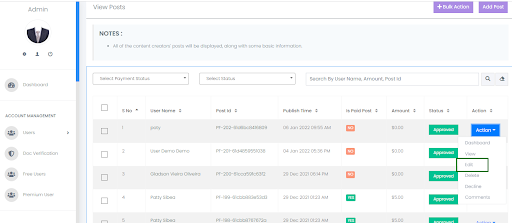
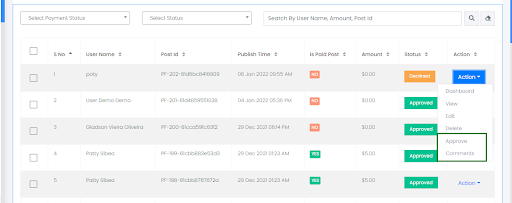
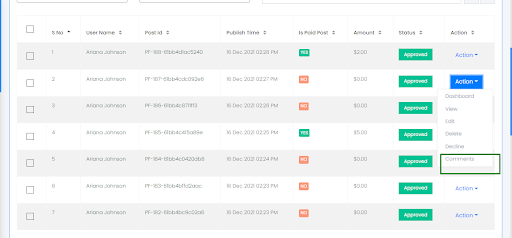
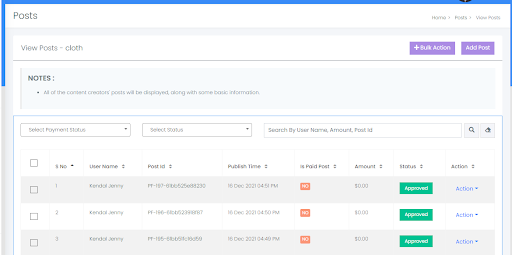
View Posts
The View Post managemnet gives you a summary view of how each post
sees all of the features on your
site such as postName , post id , publish time, Post Type, Post Status ,
PPV, and some basic user
information.
The Admin can filter Posts on the list by standard or custom
status such as Post and Payment status.
The Admin can Search users by using username , post Id , and PPV
Amount.
The Bulk action is an efficient way to complete certain actions to
multiple sections at one time as
opposed to completing the same action multiple times.Here, you can
perform a bulk action to: Delete,
Approve , and Decline the posts.
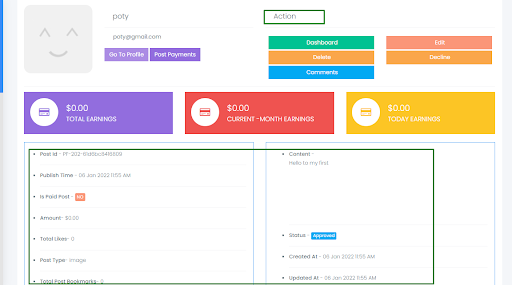
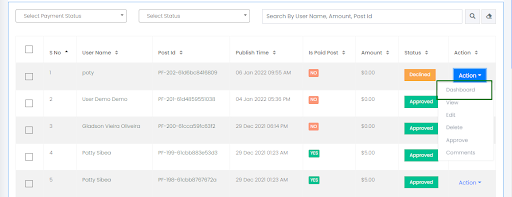
View Post
Each post can be viewed by using the ‘View’ option available
inside the action dropdown.
This page gives all detailed details and activity status of the
particular post such as Post name ,
Post category, payment, revenue, and status.
And provides all posts related actions.
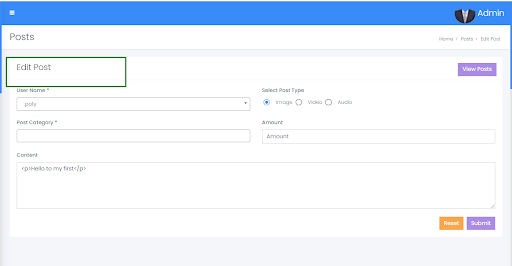
Edit/Update Post
The Edit post option provided to change post details such as a
Post name , category, content and
payment information.
Here, The Reset option is provided to restore post details.
The Admin has full permissions to update the Post.
Here, The admin is able to edit/update the post details by using
this option.
Delete Post
The Admin can Delete Single/multiple posts.
Deleting a post from an application will permanently delete that
post
And deleted posts are not able to be viewed on the application.
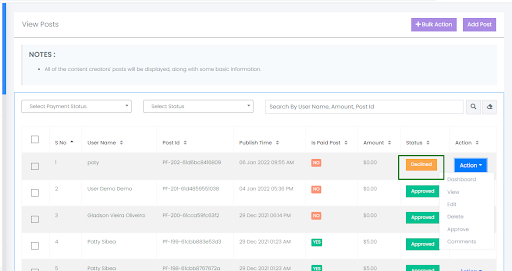
Decline Post
The Admin can Decline Single/multiple posts.
Declining a post are temporarily unavailable
And Declined posts are not able to view inside applications until
the admin approves.
And this declined posts status is shown in the post list table.
Approve Post
The Admin has an option to Approve Single/multiple declined Posts.
Using this option, the admin is able to approve the declined
posts.
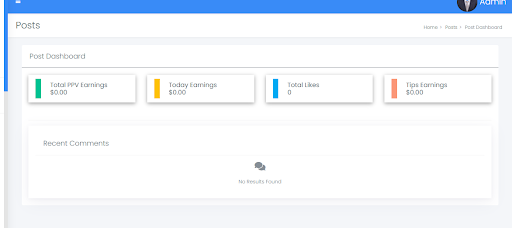
Post Dashboard
This feature is available for both free and paid posts.
Using this option, the admin can view the Post earning and likes
details.
And also the admin is able to view recent comments.
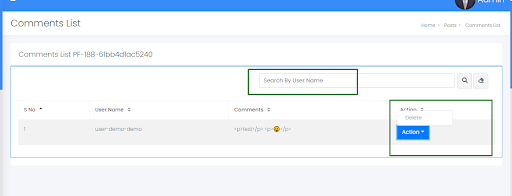
Post Comments
This option is provided to read all comments of the particular
post.
Using this option admin is able to view comments and commented
users details.
Hare, admin will have an option to delete the added comment.
Admin can search the comment by using user name.
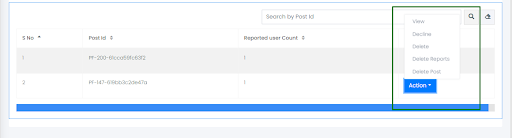
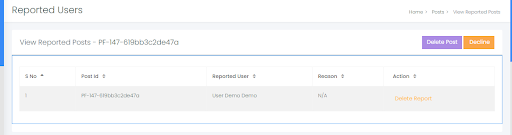
Reported Posts
Users will have one option to report the posts by adding a report
reason.
All reported Posts are displayed under this page.
Admin is able to view all these reports here.
The reported posts are displayed with Post Id , Number of reported
users counts.
Admin can do some actions on the reported posts such as view,
delete, decline, delete report and
delete post.
Using the ‘View’ option, the admin is able to view the reports in
detail.
Using the ‘Delete Reports’ option admin is able to delete all the
reports.
Users will have an option to update the user category.
And the admin should update the user category while creating new
users.
Based on these categories , the user details will be displayed on
the user side.
Admin will be able to create/update user categories.
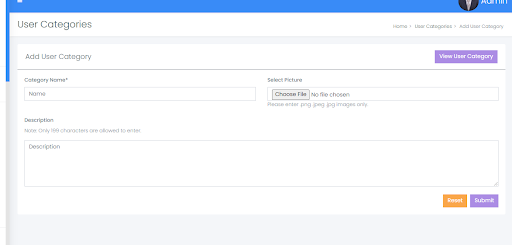
Add User Category
The Admin will have the option to create a user category by
entering category name and description.
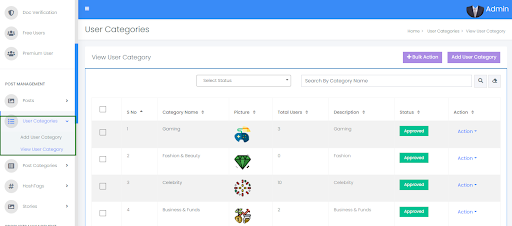
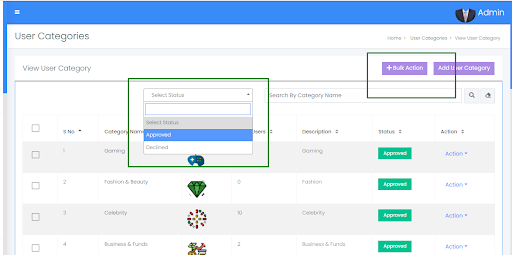
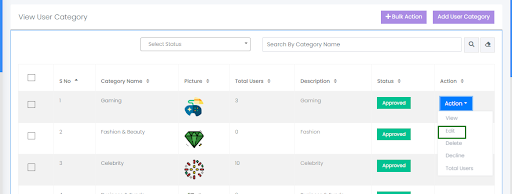
View User categories
The View User categories managemnet gives you a summary view of
how each category sees all of the
features on your site such as category name, Total Users , description
and the Status
The Admin can filter categories on the list by Category status.
The Admin can Search categories by using category names.
The Bulk action is an efficient way to complete certain actions to
multiple sections at one time as
opposed to completing the same action multiple times.Here, you can
perform a bulk action to: Delete,
Approve , and Decline the categories.
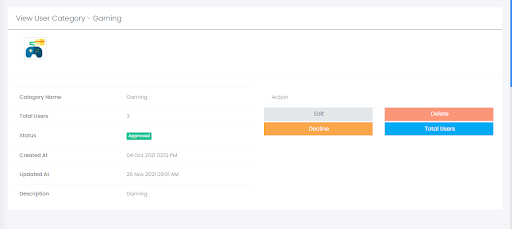
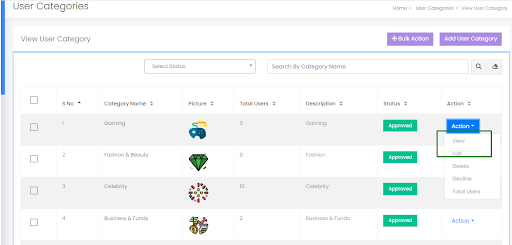
View User Category
Each category can be viewed by using the ‘View’ option available
inside the action dropdown.
This page gives all detailed details and activity status of the
particular category such as category
name , Total Users, and Description.
And provides all category related actions.
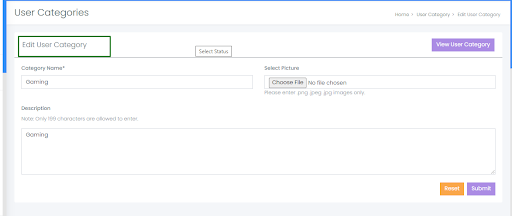
Edit/Update User Category
The Edit category option provided to update category details such
as a category name ,and
description.
Here, The Reset option is provided to restore category details.
The Admin has full permissions to update the user category.
Here, The admin is able to edit/update the category details by
using this option.
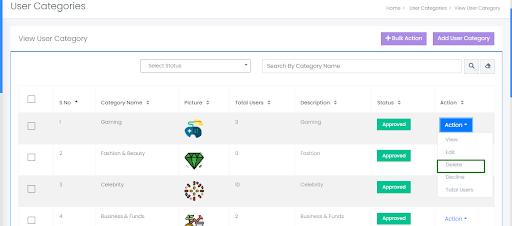
Delete User Category
The Admin can Delete Single/multiple categories.
Deleting a category from an application will permanently deletes
that category.
And deleted categories are not able to be viewed on the
application.
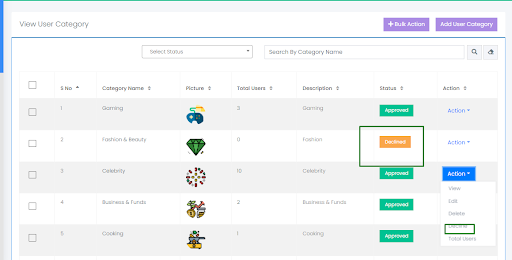
Decline User Category
Decline User Category.
Declining a categories are temporarily unavailable.
And Declined categories are not able to view inside applications
until the admin approves.
And this declined category's status is shown in the view category
list table.
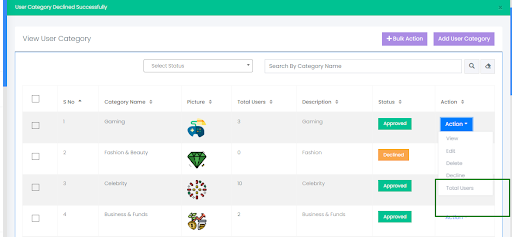
Total Users
By using this option , The Admin is able to view total users
details of the particular category.
Both Users and admin will have an option to update the post
category while creating a post.
And the admin should update the post category while creating new
posts.
Based on these post categories , the post details will be
displayed.
Admin will be able to create/update post categories.
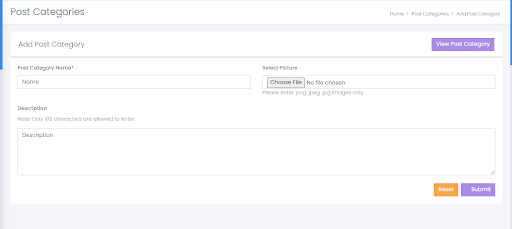
Add Post Category
The Admin will have the option to create a post category by
entering category name and description.
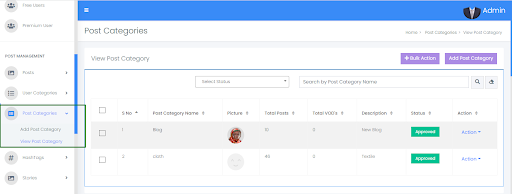
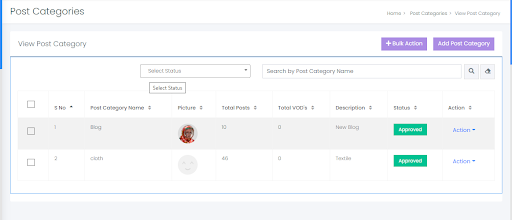
View Post categories
The View post categories managemnet gives you a summary view of
how each category sees all of the
features on your site such as category name, Total Posts , description
and the Status ,
The Admin can filter categories on the list by Category status.
The Admin can Search categories by using category names.
The Bulk action is an efficient way to complete certain actions to
multiple sections at one time as
opposed to completing the same action multiple times.Here, you can
perform a bulk action to: Delete,
Approve , and Decline the categories.
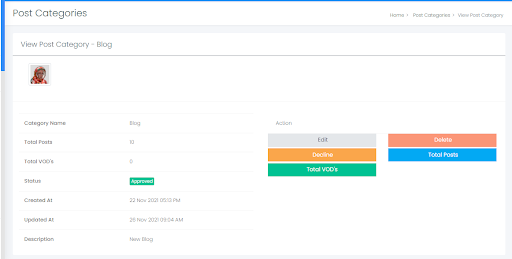
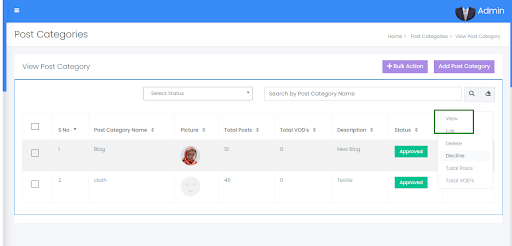
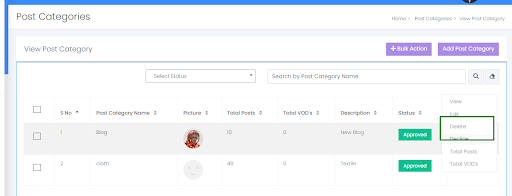
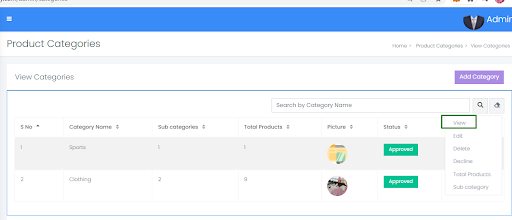
View Post Category
Each category can be viewed by using the ‘View’ option available
inside the action dropdown.
This page gives all detailed details and activity status of the
particular category such as category
name , Total Posts, and Description.
And provides all category related actions.
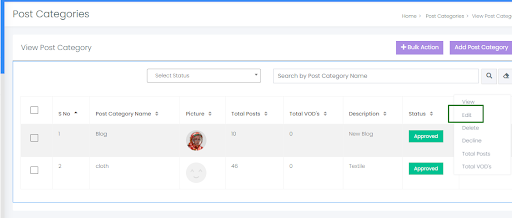
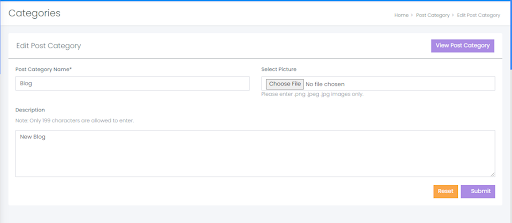
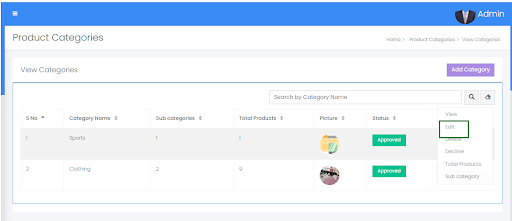
Edit/Update Post Category
The Edit category option provided to update category details such
as a category name ,and
description.
Here, The Reset option is provided to restore category details.
The Admin has full permissions to update the post category.
Here, The admin is able to edit/update the category details by
using this option.
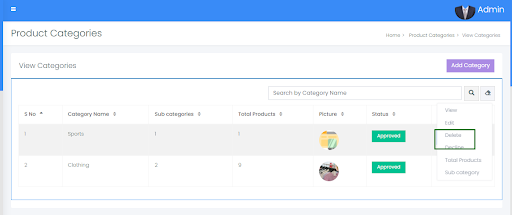
Delete Post Category
The Admin can Delete Single/multiple categories.
Deleting a category from an application will permanently deletes
that category.
And deleted categories are not able to be viewed on the
application.
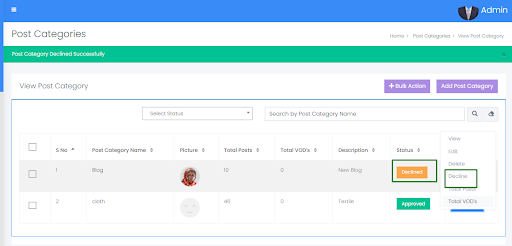
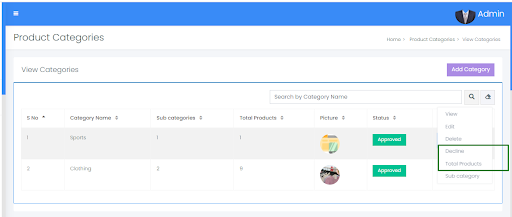
Decline Post Category
The Admin can Decline Single/multiple Categories.
Declining a categories are temporarily unavailable.
And Declined categories are not able to view inside applications
until the admin approves.
And this declined category's status is shown in the view category
list table.
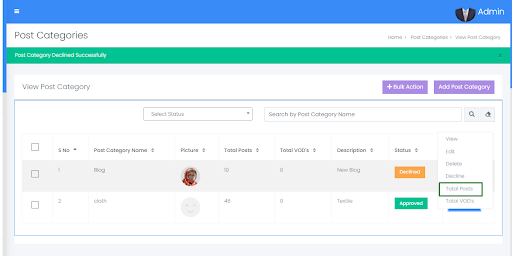
Total Posts
By using this option , The Admin is able to view total Posts
created under the particular category.
A hashtag is a label for content. It helps users who are
interested in a certain topic, quickly find
posts on that same topic.
A hashta is written with a # symbol, is used to index keywords or
topics.
Here, the admin will have an option to create new hashtags.
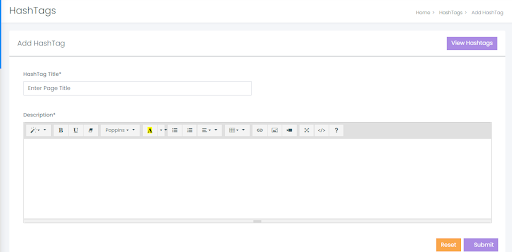
Create HashTag
Here, the admin will have the option to create new hash tags by
entering hashtag name and
description.
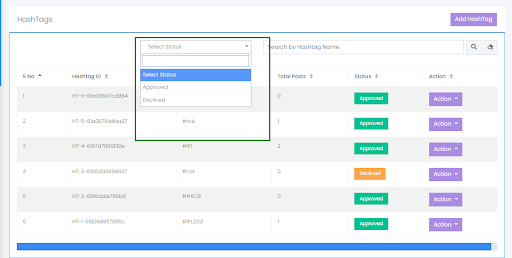
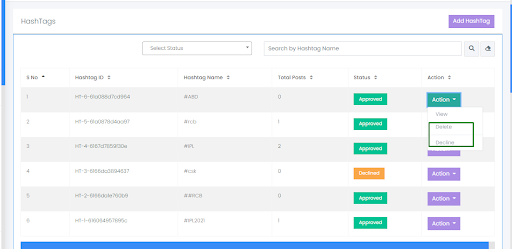
View HashTag
Both User and Admin can add hashtags.
All added tags are displayed here with some basic information such
as Tag name, Tag Id, Total posts
and status.
The Admin is able to filter the tags based on the status.
And the Admin will have a search option to search the tags by
using tag names.
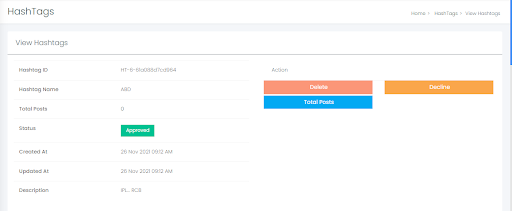
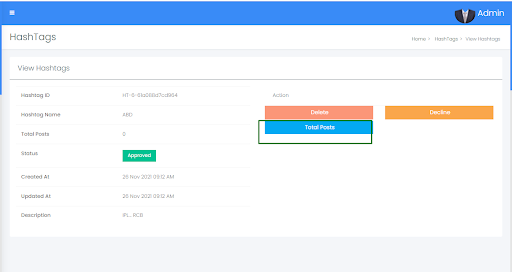
View Page
The Admin can see the details of the hashtag in the view page.
In This page all details of the tag are displayed such as tag
name, Total Posts, and created/updated
dates.
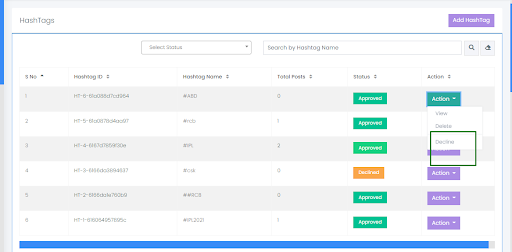
Delete HashTag
The Admin can delete the Hashtag by using this option.
Decline HashTag
The Admin can decline the Hashtag by using this option.
HashTag -Total Posts
The Admin can view all posts, which are created under particular
hashtags.
Stories allows users to share photos and videos as their statuses
that disappear automatically after
24 hours.
And these created stories are visible on follower users side.
Both User and Admin can create stories.
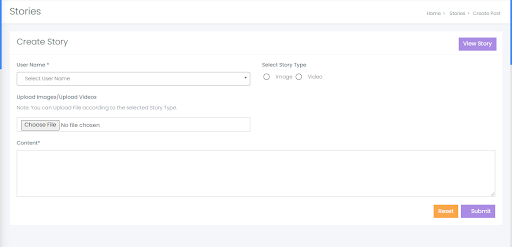
Create Story
Here, the admin is able to create a story for the user.
The admin can create a story by entering user name, story file and
story content.
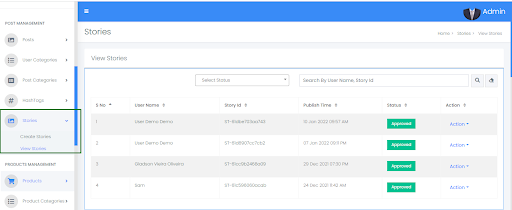
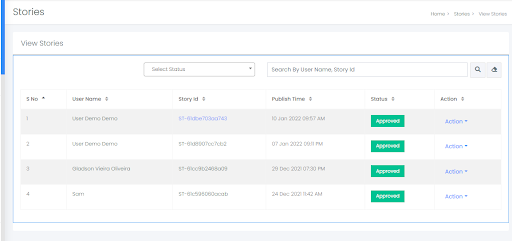
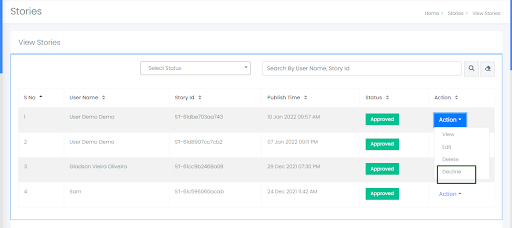
View Stories
All created stories are listed here.
Stories are displayed here with some basic information such as
user name , story Id, and Status.
The Admin will have the option to filter the stories based on the
status.
The search bar is provided to search the stories by using username
and story id.
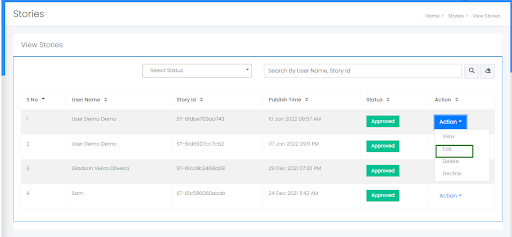
Edit Story
The Edit story option is provided to update story details such as
a user name,and story file.
Here, The Reset option is provided to restore story details.
The Admin has full permissions to update the story.
Here, The admin is able to edit/update the story details by using
this option.
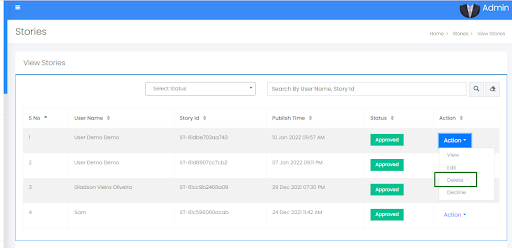
Delete Story
The Admin can Delete Single/multiple stories.
Deleting a story from an application will permanently deletes
story on user side.
And deleted stories are not able to be viewed on the application.
Decline Story
The Admin can Decline Single/multiple Stories.
Declining a story are temporarily unavailable.
And Declined stories are not able to view inside applications
until the admin approves.
And this declined stories status is shown in the stories list
table.
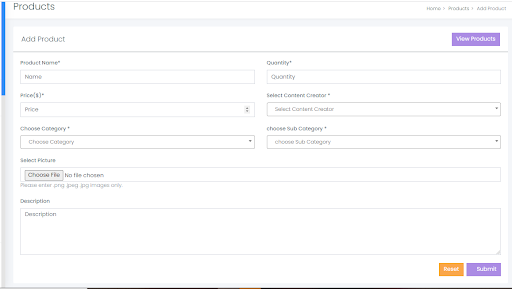
Add Product
The Admin will have the option to add the products to the Content
Creator.
The Admin can add the product by entering all required product
details such as product name,
quantity, price and category details.
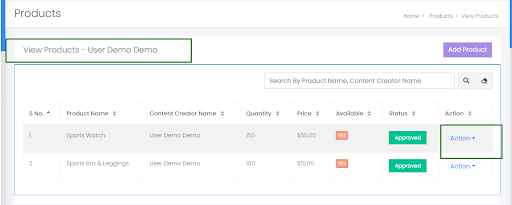
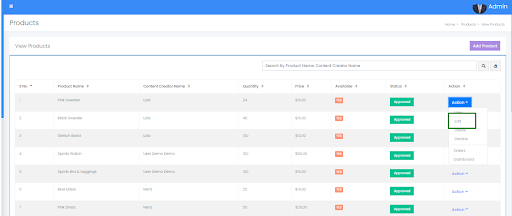
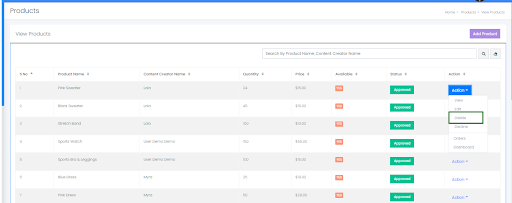
View Products
The View product managemnet gives you a summary view of how each
product sees all of the features on
your site such as Product Name , Content Creator Name , Quantity, Price
, Status , and Availability
status.
The Admin can Search products by using CC Name , and product name.
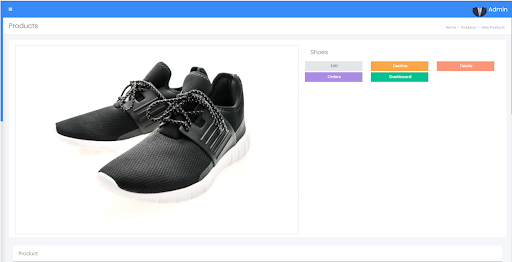
View Products Page
Each product can be viewed by using the ‘View’ option available
inside the action dropdown.
This page gives all detailed details and activity status of the
particular product such as product
name , product category, payment, revenue, and status.
And provides all product related actions.
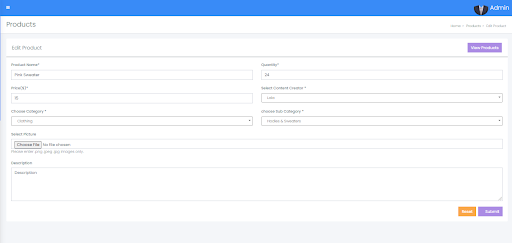
Edit Products
The Edit product option provided to update product details.
Here, The Reset option is provided to restore Product details.
The Admin has full permissions to update the Product.
Here, The admin is able to edit/update the Product details by
using this option.
Delete Products
The Admin can Delete Single/multiple Products.
Deleting a product will permanently delete that product from
e-commerce.
And deleted products will be removed from the product list.
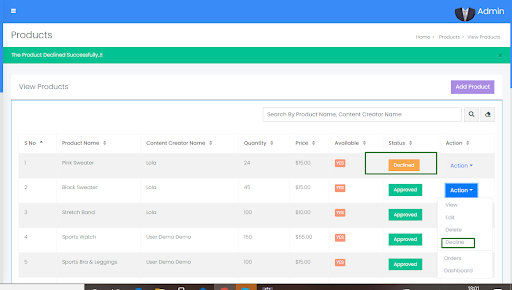
Decline/Approve Products
The Admin can Decline Single/multiple products.
Declined a products are temporarily unavailable.
And Declined products are not able to view inside applications
until the admin approves.
And this declined product's status is shown in the productslist
table.
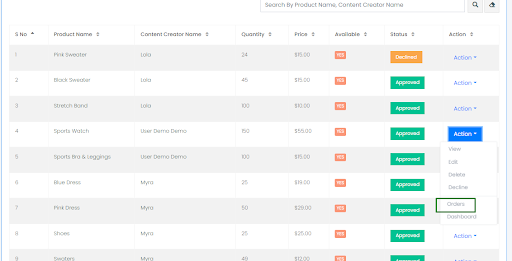
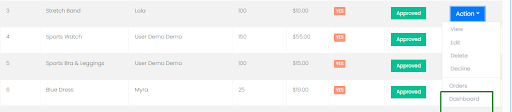
Orders
The admin will have an option to view all orders of the specific
product.
The product order details will be displayed in the table with
basic details such as username,
product name, delivery address, order Id, and order status.
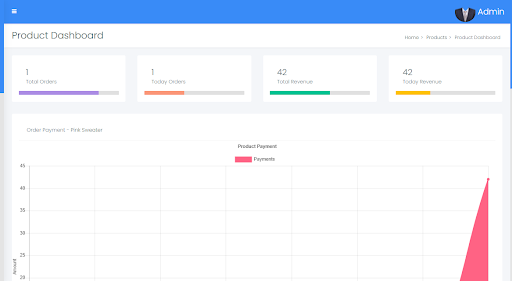
Product DashBoard
This option is provided to show the product orders and revenue
statistics.
Using this option, the admin can view the product orders and
Product Revenue details.
Using these product categories both users and admin can create
products.
Based on these categories, the user will be able to filter/search
the products.
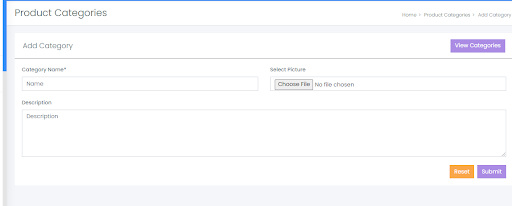
Add Product Category
The Admin will have the option to create a product category by
entering category name and
description.
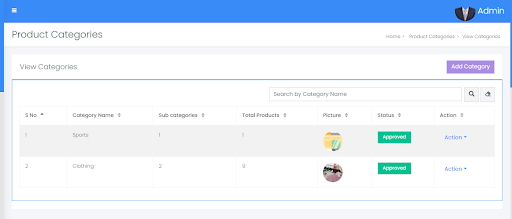
View Product Category
The View product categories managemnet gives you a summary view of
how each category sees all of the
features on your site such as category name, Total products ,
description and the Status ,
The Admin can Search categories by using category names.
View Product Category Page
Each category can be viewed by using the ‘View’ option available
inside the action dropdown.
This page gives all detailed details and activity status of the
particular category such as category
name , Total Products , and Description.
And provides all category related actions.
Edit Product Category
The Edit category option provided to update category details such
as a category name ,and
description.
Here, The Reset option is provided to restore category details.
The Admin has full permissions to update the Product category.
Here, The admin is able to edit/update the category details by
using this option.
Delete Product Category
The Admin can Delete Single/multiple categories.
Deleting a category from an application will permanently deletes
that category.
And deleted categories are not able to be viewed on the
application.
Decline Product Category
The Admin can Decline Single/multiple Categories.
Declining a categories are temporarily unavailable.
And Declined categories are not able to view inside applications
until the admin approves.
And this declined category's status is shown in the view category
list table.
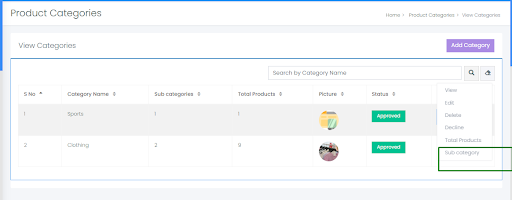
Total products of the Product category
By using this option , The Admin is able to view total products
created under the particular
category.
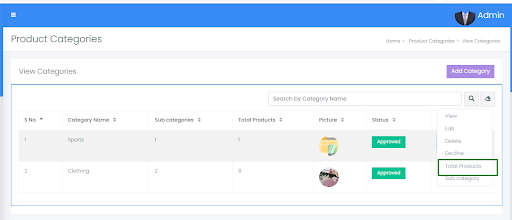
Total Sub categories of the Product category
By using this option , The Admin is able to view total sub
categories created under the particular
category.
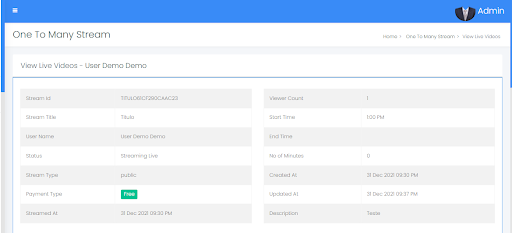
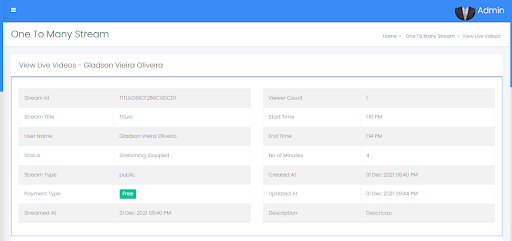
Live Videos
All Live going streams are displayed here.
And the admin can view these live streaming video details by
clicking on the the view option.
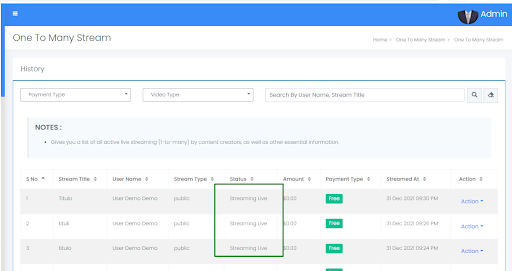
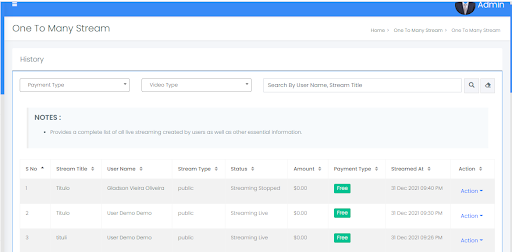
History
All Live streams History are displayed here.
And the admin can view these live streams video details by
clicking on the view option.
Here, the admin is able to filter the streams based on the stream
type and payment type.
And the search option is provided to to search the streams by
using user name and stream title.
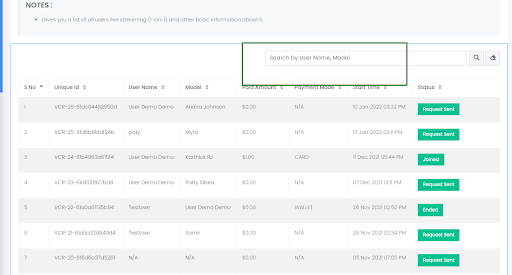
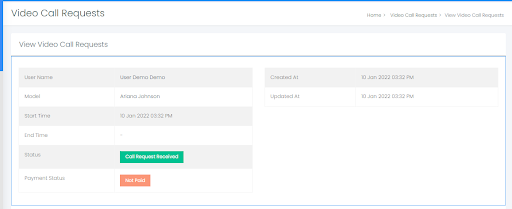
Video Call Request
All Video call requests are displayed here with basic details such
as user name, request id, status,
amount and revenue details.
And the admin can view these Video call request details by
clicking on the view option.
And the search option is provided to to search the request by
using user name and model name.
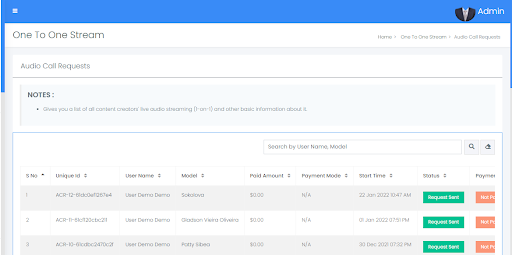
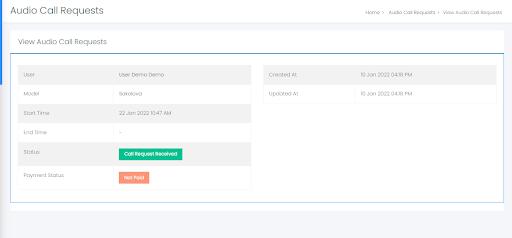
Audio Call Request
All Audio call requests are displayed here with basic details such
as user name, request id, status,
amount and revenue details.
And the admin can view these Audio call request details by
clicking on the view option.
And the search option is provided to to search the request by
using user name and model name.
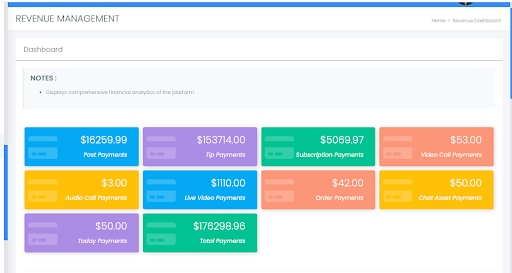
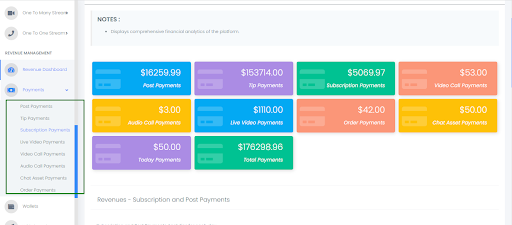
All revenue details are displayed here.
Here, the admin can view all payments and posts details and
statistics.
All Users payments details are displayed here.
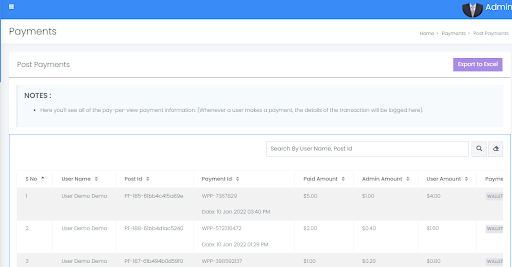
Posts Payments
All Users post payment are displayed here.
Here, the admin can view post payment details such as user name,
post id, payment id, paid amount,
post amount, and payment mode.
The admin can view post payment details by clicking on the option
‘View’ option.
The Admin is able to send an invoice to the regosted mail id by
using send invoice option.
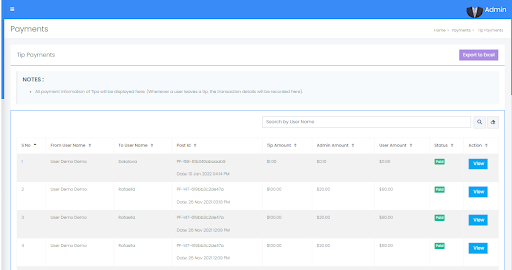
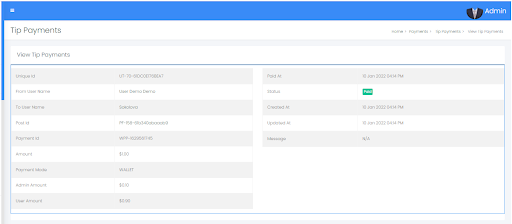
Tip Payments
All Users Tip payments are displayed here.
Here, the admin can view Tip payment details such as user name,
post id, payment id, paid amount,
Tip amount, user commission , admin commission, and payment mode.
The admin can view detailed details by clicking on the option
‘View’.
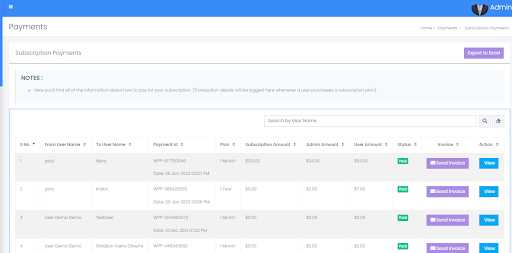
Subscription Payments
All Users Subscription payments are displayed here.
Here, the admin can view Subscription payment details such as user
name, post id, payment id, paid
amount, subscription amount, user commission , admin commission, and
payment mode.
The admin can view detailed details by clicking on the option
‘View.
Live Payments
All Users Live video payments are displayed here.
Here, the admin can view live video payment details such as user
name, video title, payment id, paid
amount, subscription amount, user commission , admin commission, and
payment mode.
The admin can view detailed details by clicking on the option
‘View’.
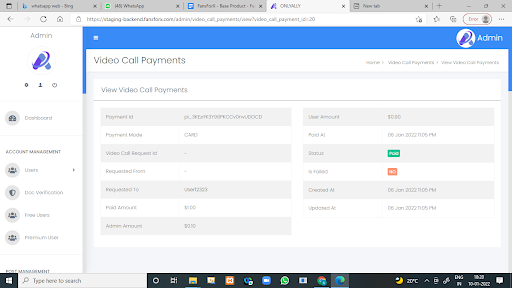
Video Call Payments
All Users video call payments are displayed here.
Here, the admin can view video call payment details such as user
name, Model, payment id, paid
amount, user commission , admin commission, and payment mode.
The admin can view detailed details by clicking on the option
‘View’.
The search option is provided to search the payment details by
using payment Id.
The admin will have the option to export these payment details to
the excel format.
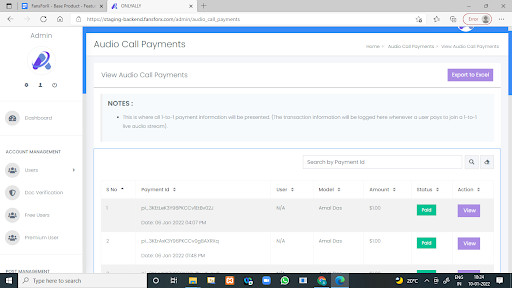
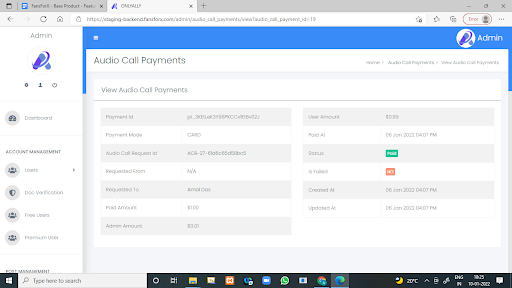
Audio Call Payments
All Users Audio call payment are displayed here.
Here, the admin can view Audio call payment details such as user
name, Model, payment id, paid
amount, user commission , admin commission, and payment mode.
The admin can view detailed details by clicking on the option
‘View’.
The search option is provided to search the payment details by
using payment Id.
The admin will have the option to export these payment details to
the excel format.
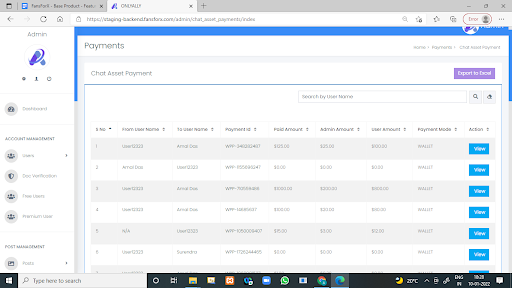
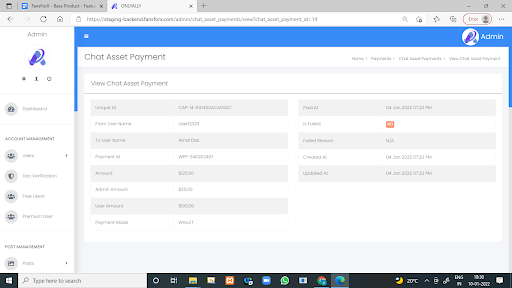
Chat Asset Payments
All Chat asset payments are displayed here.
Here, the admin can view all users' chat payment details such as
from user name, To user name,
payment id, paid amount, user commission , admin commission, and payment
mode.
The admin can view detailed details by clicking on the option
‘View’.
The search option is provided to search the payment details by
using Username.
The admin will have the option to export these payment details to
the excel format.
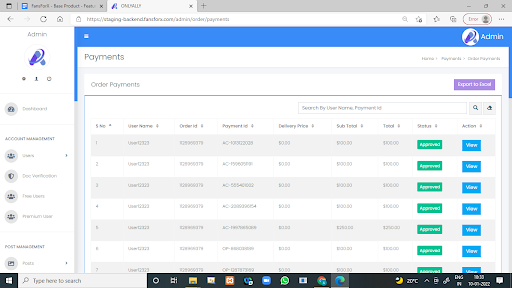
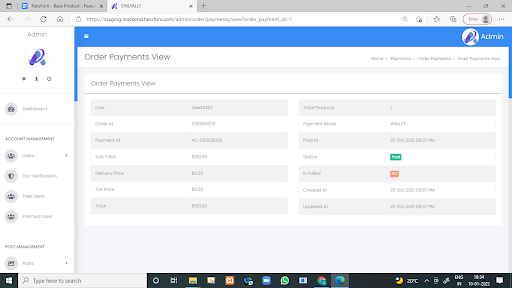
Order Payments
All order payments are displayed here.
Here, the admin can view all products' order payment details such
as from user name, Order Id,
payment Id, pricing and status.
The admin can view the specific payment details by clicking on the
option ‘View’.
The search option is provided to search the payment details by
using Username and Payment Id.
The admin will have the option to export these payment details to
the excel format.
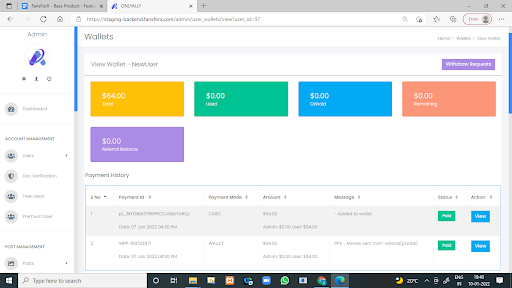
All users' wallets are displayed here.
Here admin will be able to track and update the information about
tokens and transactions of all
users.
This page contains some basic wallet details such as Wallet Id,
user name, and wallet balance
details.
The Admin is able to search the user wallet by entering username
or wallet Id.
The Admin will have the option to view the wallet details of the
particular user.
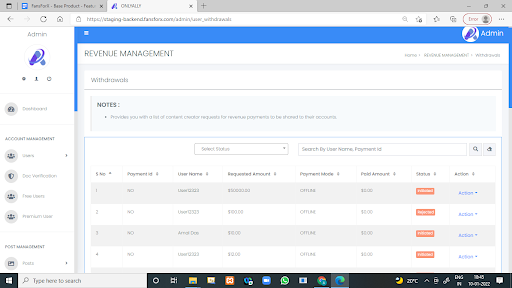
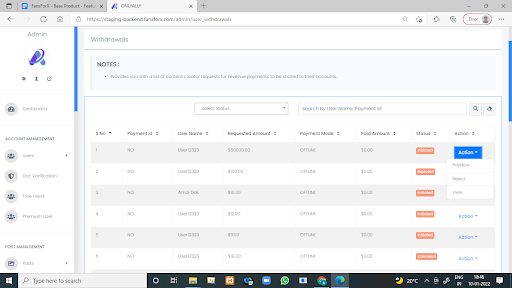
All users withdraw requests are displayed here.
It Provides a list of content creator requests for revenue
payments to be shared to their accounts.
This page contains some basic request details such as payment Id,
user name, Requested amount, paid
amount, Payment Mode and Request Status.
The Admin will have the options to pay for the request or to
reject the request.
The Billing account details should be updated by the requested
users.
Here, the admin is able to filter the requests based on the
requests status.
The Admin is able to search user requests by entering username or
payment Id.
The Admin will have the option to view the request details of the
particular user.
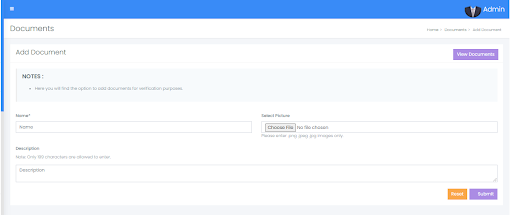
Add Documents
Only the admin can create required user documents.
The Admin can create documents by entering the Document name,
image and Description.
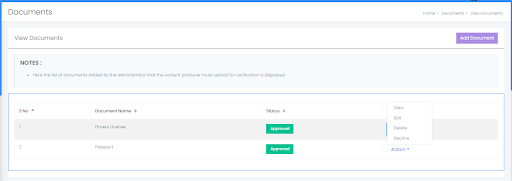
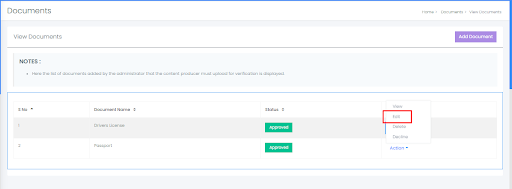
View Documents
All created Documents are displayed here with document name and
status.
The Admin can perform some basic actions on the documents such as
edit, delete and decline.
Edit Documents
The Edit document option provided to update document details such
as a document name ,and
description.
Here, The Reset option is provided to restore document details.
The Admin has full permissions to update the Document.
Here, The admin is able to edit/update the document details by
using this option.
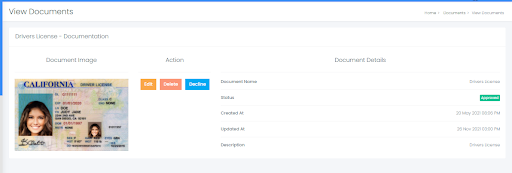
View Documents
Each document can be viewed by using the ‘View’ option available
inside the action dropdown.
This page gives all details and activity status of the particular
document such as document name ,
Status, and created/updated time.
And provides all documents related actions such as edit, delete,
and decline.
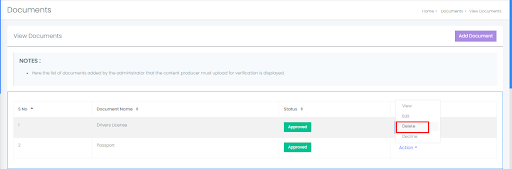
Delete Documents
The Admin can Delete Single/multiple documents.
And deleted documents are not able to be viewed in the
application.
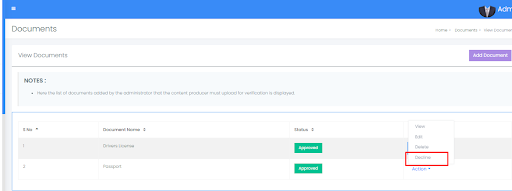
Decline Documents
The Admin can Decline Single/multiple documents.
Declining a documents are temporarily unavailable.
And Declined documents are not able to view inside applications
until the admin approves.
And this declined documents status is shown in the post list
table.
The website footer is the section of content at the very bottom of
a web page.
It typically contains copyright pages, such as privacy policy,
Terms and Condition, contact
information, and Help.
In short, this page contains information that improves a website’s
overall usability.
Create Page
Only the admin can create a new page here.
Admin must enter all required details.
Admin can view all his created pages inside the View page.
The created pages are visible on the user side.
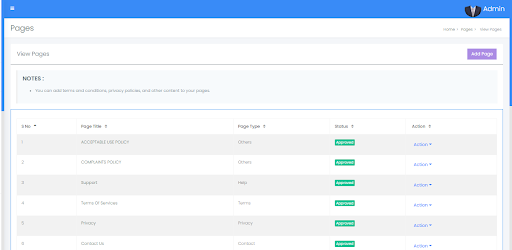
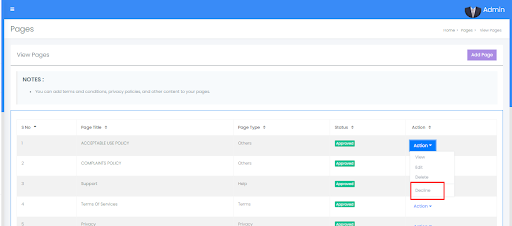
View Pages
The View page managemnet gives you a summary view of how each page
sees all of the features on your
site such as page name, page type , section type, Post Type, and page
Status.
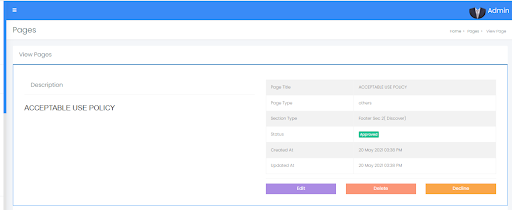
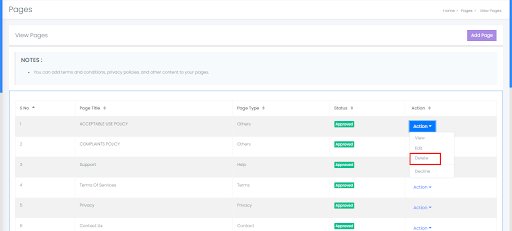
View Single Page
Each page can be viewed by using the ‘View’ option available
inside the action dropdown.
This page gives all details and activity status of the particular
page such as page name , page type
, section type , and status.
And provides all page related actions such as edit, delete and
decline.
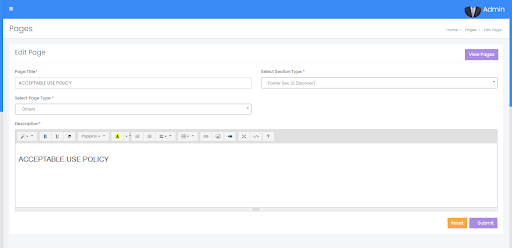
Edit/Update Page
The Edit page option provided to update page details such as a
page name , type, content and
Description.
Here, The Reset option is provided to restore page details.
The Admin has full permissions to update the Page content.
Here, The admin is able to edit/update the page details by using
this option.
Delete Page
The Admin can Delete Single/multiple Pages.
And deleted pages are not available on the user side.
Decline Page
The Admin can Decline Single/multiple pages.
Declined pages are temporarily unavailable.
And Declined pages are not able to view inside applications until
the admin approves.
And this declined page's status is shown in the pages list table.
Every user will have an option to report the post.
Users can mention the reason for the report.
These reasons are added by the admin.
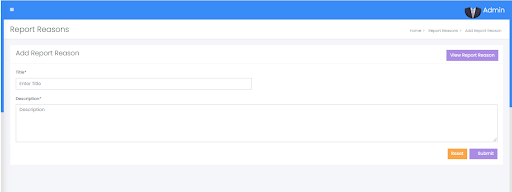
Add Report Reason
Only the Admin can add report reasons here.
Admin must enter all required details.
Admin can select the post categories which are mandatory.
Admin can view all added reasons inside the View report reason
page.
The added reasons are updated on the user side.
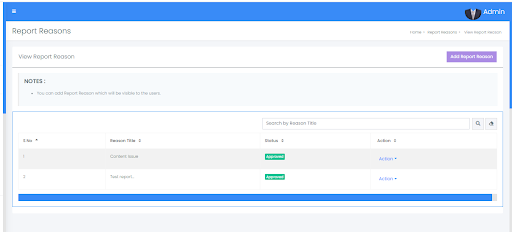
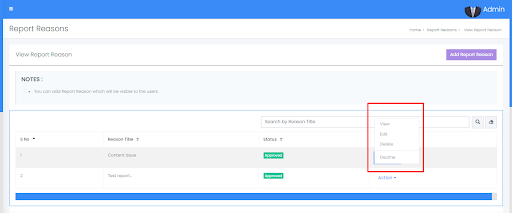
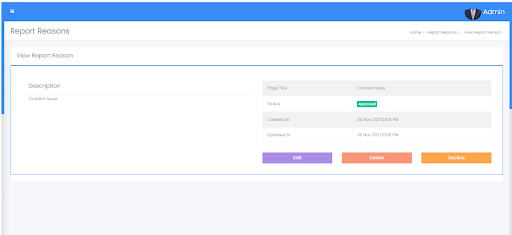
View Report Reasons
The View report reasons managemnet gives you a summary view of how
each reason sees all of the
features on your site such as reason title ,Status , and Description.
The admin can perform some basic actions for these reasons, such
as edit , delete, and decline.
The admin can do some settings here such as site, email, social,
live video, image, contact, and
configuration settings.
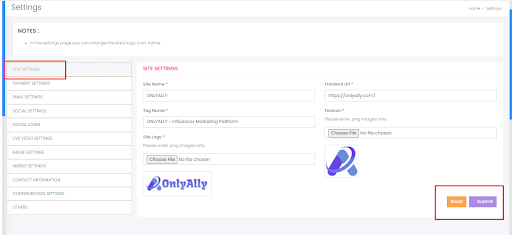
Site Setting
Here, the admin is able to set the site related settings such as
site name, urls, and logo details.
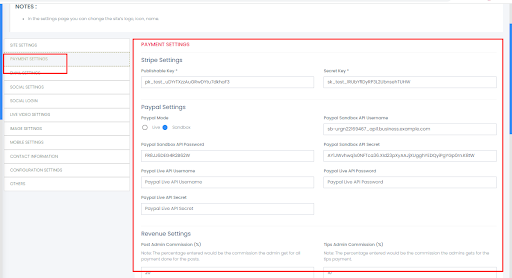
Payment Setting
Here, the admin is able to set all payment related settings such
as revenue setting, payment mode
setting and referral settings.
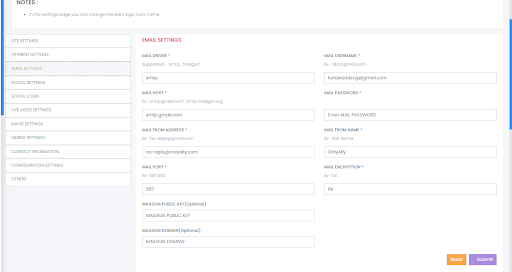
Email Setting
Here, the admin is able to set all email contact related settings.
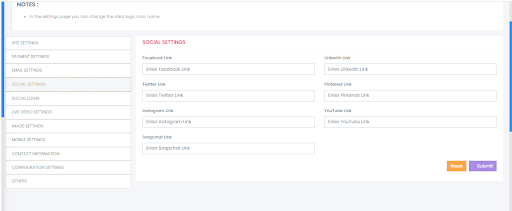
Social Settings
Here, the admin is able to update all social link related
settings.
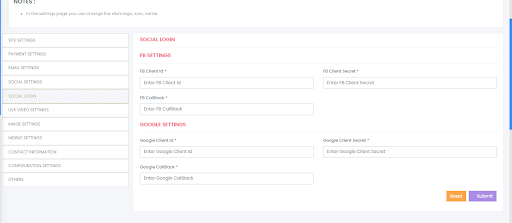
Social Logins
Here, the admin is able to update all social logins related
settings.
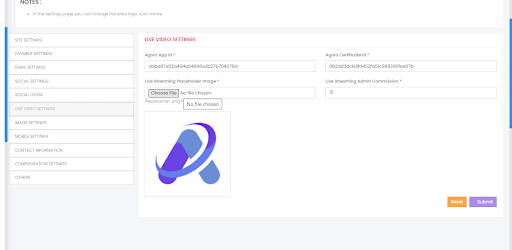
Live Videos Settings
Here, the admin is able to set all live streams related settings.
Image Settings
Here, the admin is able to set all images related settings.
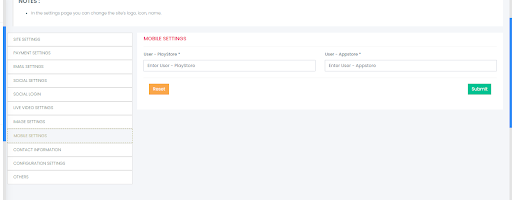
Mobile Settings
Here, the admin is able to set appstore and playstore settings.
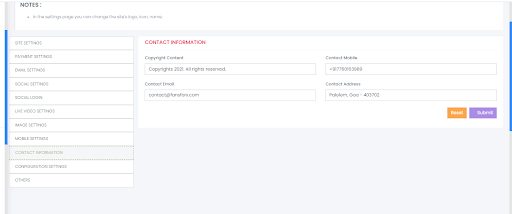
Contact Settings
Here, the admin can update contact information settings.
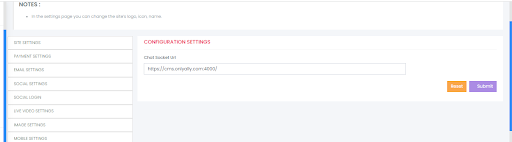
Configuration Settings
Here, the admin can update Configurations.
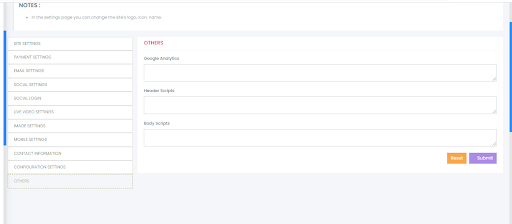
Others Settings
Here, the admin can update other settings.
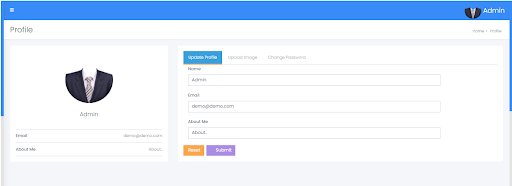
The admin account details are displayed here.
And The admin can perform some profile related actions such as
update profile, change password and
upload profile image.
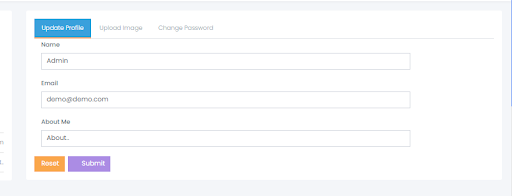
Update Profile and Image
Here, the admin can update his account details such as name,
image, email and about me.
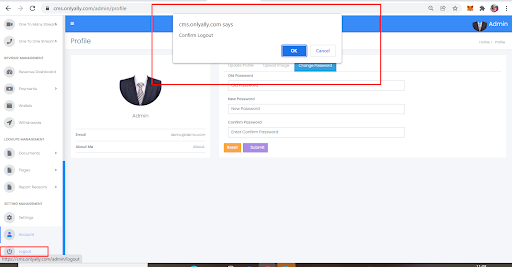
Change Password
Here, the admin can update his password by using this feature
The Admin can log out from the account using this feature.